25.11.12

DIY TIERED JEWELRY STAND

I've seen a couple of different DIY jewelry stand tutorials and I thought I'd give it a try.
It was really easy and it only cost me about $5 because I was able to get all the supplies at the dollar store.

Supplies needed:
Three different sized plates (small, medium, and large)
Two small candle stick holders (if they're too tall the stand could tip over)
Glue gun
Measuring tape
Marker


001. Measure the middle of each plate and mark


002. Apply glue to the bottom of one candle stick holder and place in the middle of the biggest plate.
Apply pressure to the candle holder and wait for the glue to dry.


003. Apply glue to the top of the candle stick holder and place the medium sized plate on top where you made your mark. Apply pressure again.
 Repeat the previous steps for the smallest plate.


The finished product!


I used mine for bracelets, rings, and nail polish but you can use yours for whatever you'd like!


20.11.12

CHIK

I'm so excited to announce that I am now a contributing blogger for the new Chik app!
Chik (sheek) is a fashion magazine based in London and they just launched their new app for the iPad! The free magazine is curated by fashion bloggers to offer personal insights, unbiased opinions, and real life experiences.
If you have an iPad you should totally download the app!


17.11.12

PRETTY FROM AFAR LIKE A DARK STAR


I snatched up this sweater on sale from Forever 21. It has mini rhinestones on the front that I debated replacing with studs but later decided not to because the sparkle kind of grew on me. 
I've been really inspired  by Free People and their winter lookbooks. I loved that they layered chunky sweaters with feminine pieced like chiffon and lace. So when I found this sweater, I knew that's exactly what I was going to do. 

Forever 21 sweater, chiffon tank, and leggings
Thrifted boots

15.11.12

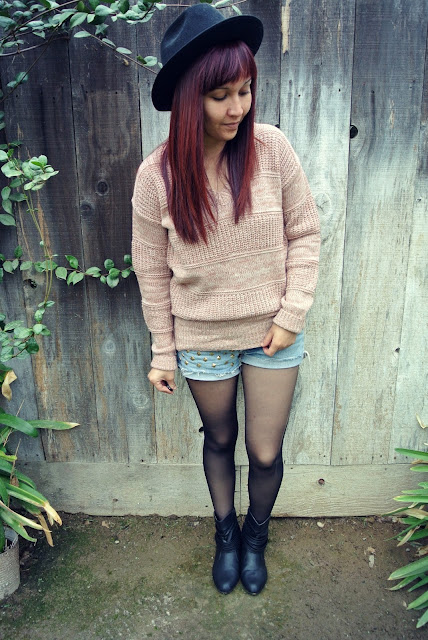
PRETTY IN PINK


So far my little vacation has been pretty good. Today I took my grandpa out to lunch and then ran a few errands. I had to pick up a denim needle for my sewing machine because I have a couple of alterations to do for my mother, who thinks I'm her in home seamstress by the way. While I was at the craft store I met the nicest lady who made her own shower loofahs! I thought it was the coolest thing. I love meeting other people who are super crafty. It always makes my day. 


I've been looking for a great pair of black ankle boots for a while now so once I found these I knew my search was over. The best part, is that they were only $12!  I'm pretty sure they're going to become a favorite this winter. 

Forever 21 sweater
Thrifted/DIY shorts
DD's boots
Gifted fedora

14.11.12

DIY TIE-DYE TIGHTS

After seeing a few tie-dye tight tutorials online and hearing that its super easy and inexpensive, I thought I would give it a try. These were the result and I love them! In this post I will show you how I did it!


Supplies:
Rit Dye (in which ever color you'd like, I chose navy blue)
White tights
Rubber Bands
Bucket
Gloves
Something to stir the dye (I used a plastic fork)


1. Bunch up your tights and secure them with rubber bands.
I did two pairs. One which was brand new and one that was old. The new pair took the dye better and came out way cuter.

2. Fill bucket about half way with boiling water. 
I boiled water in a kettle and then poured it into the bucket. I did everything outside just in case I made a mess and remember you're working with dye which is permanent so make sure you're wearing something you don't mind staining.

3. While wearing gloves, stir in your dye.

4. Add your tights 
Make sure you fully submerge them and continue to mix the dye for about 20 to 30 minutes. The longer they are in the dye the darker the color will be when they are done. I left mine in for about 25 minutes.


5. Rinse with cold water
I rinsed mine outside because we have ceramic sinks and bathtubs and the dye would stain them. 
At first a lot of dye will come out of the tights but that's ok, that's supposed to happen. Rinse until no more dye comes out and the water runs clear.


6. Hang to dry

Then you're all done!
They'll add the perfect amount of grunge to any outfit!

SPIRIT DESIRE


I just so happened to be walking through target telling myself I was there for just a few things and nothing else. Then I made the mistake of  walking by these pants. As soon as I saw that they were on sale, I had to have them. They fit really well and I looove the polka dot print. I'm so excited to work them into my winter wardrobe.


I ordered this tote from my super sweet friend Bri. Ive had my eye on this tote for a while and once I saw that it was on sale, I was so excited to finally order one. 
You can check out her etsy shop, Five and Two, here 

Urban Outfitters sweater
Target jeans
Ebay flats


Ive had this song on repeat lately

13.11.12

STRIPES AND AN ANORAK


So this week I'm on vacation from work and after two weeks of overnight shifts, it's much needed. I have a couple of DIY projects planned, Im hoping to get a few blog posts done; and naturally, I'll be doing some thrifting.


 I wore this outfit to pick up a few things from the craft store and get a little xmas shopping done. I was super excited to finally wear this anorak because it was a steal for only $7. I wanted to be comfortable so I paired this over sized top with leggings and ballet flats.

Forever 21 anorak, top, leggings and necklace
Ebay flats
DIY knuckle rings

 These above the knuckle rings were one of my DIY projects for this week and I am in love with the way they came out. I was so pumped on them I bought black and gold wire so that I can make more. I'm hoping to do a DIY post soon.